
 Today's post is by Lindsey Mandigo. Lindsey not only has an eye for decor, she can figure out how to make what she wants for way less than what one would pay at a decor store.
I've admired Lindsey's ability to create beautiful decor and gifts for her family and her home for years. I'm thrilled to share Lindsey's post here today. If you haven't had a chance to decorate for fall, this is a fun project that will set the Thanksgiving theme for your home. And, as Lindsey points out, it can be changed to match any season!
Today's post is by Lindsey Mandigo. Lindsey not only has an eye for decor, she can figure out how to make what she wants for way less than what one would pay at a decor store.
I've admired Lindsey's ability to create beautiful decor and gifts for her family and her home for years. I'm thrilled to share Lindsey's post here today. If you haven't had a chance to decorate for fall, this is a fun project that will set the Thanksgiving theme for your home. And, as Lindsey points out, it can be changed to match any season!
Once upon a time I used to love buying holiday decorations for my house...until I realized I was becoming more and more disappointed with the selection stores supplied.
I could typically find rather affordable decor items at chain stores like Walmart and Target but their quality and taste has drastically dropped [in my opinion] over the last several years. I was settling for pieces that I didn't like 100%. There was always something wrong. The wrong color of flowers, berries, accents, etcetera. This left me wanting.
And thus I started on my journey of creating exactly what I wanted, for a fraction of the cost of purchasing something similar.
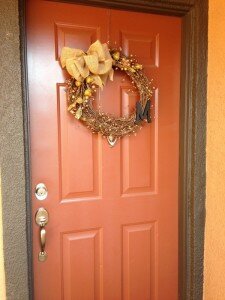
Today I am going to give you a quick and easy tutorial of my first ever semi-handmade holiday item: a fall (or any season of your choosing) wreath. This wreath cost me $18 to make. I feel that the price was a steal of a deal for building a wreath to the exact look and feel that I wanted. Just so you are aware, and to be completely honest, the total is excluding the cost of the glue-gun and glue since it is a typical item most crafters already have...however I didn't own one! I also used a 40% off coupon and purchased some of these items "on sale" as well.
Here is a breakdown of the materials I used: (all materials were purchased at Michaels.)
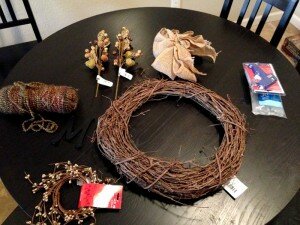
- "ashland naturals" pre-made grapevine wreath
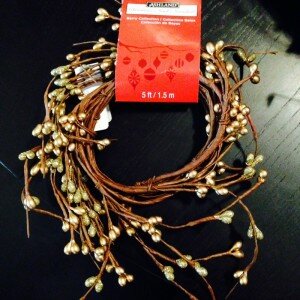
- "ashland christmas berries" 5ft garland
- large burlap bow or Roll of burlap (depends on the store)
- "celebrate it" holiday stems of your choice (I went with a leaf/pear/pearl ball design)
- last Name wooden initial of your size and color preference
- hot glue gun
- glue
- (the photo shows yarn however I did not use it to keep it fast and simple)
- While your glue is warming up take the 5ft garland and upwrap it. Lay it around the circumference of the wreath. It should fit the wreath perfectly...with maybe a slight overlap from end to end. (Do not wrap it completely around the sides and back for it will not be long enough.)
- Play around with the garland by manipulating the small branches. Bend them in different directions until it looks the way you want it to. To give the wreath more depth try pulling some away from the wreath body.
 Glue the main vine of the garland down to pieces of the wreath. Don't go crazy. Every 4-6 inches should be plenty to secure it.
- Take the two holiday stems. These stems have wires in them as well and are harder to bend but it is doable. Give the ends of the stems a good bend...to like a 90 degree angle. This gives them extra leverage for gripping around the wreath. The bow will go over this part as well so it doesn't matter what it looks like. Lay down the stems with the ends bent for "hugging" around the side of the wreath. Position them in the upper left or right side of your wreath: whatever you prefer.
- Glue down the stems once or twice under the visible decorative part and then give the bent ends a good chunk of glue under each around the sides of the wreath.
- Next reposition the wreath exactly how you want it to hang. I recommend to not move it again til done. This will help you remember where the top of it is and hopefully you won't need to pull anything off like I did...I glued my letter way too high making the wreath have an off-balanced feel. Not attractive!
-
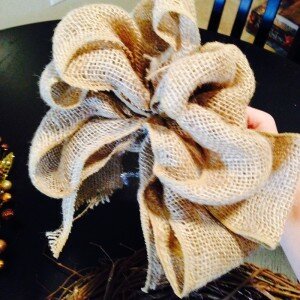 Next build your bow if it isn't already pre-made. I found a great tutorial of how I made my bow by searching google. This tutorial is from a cute crafting site called "thistlewood farms". Adorable. Even though I purchased it pre-made (since Michael's didn't have a roll of it for sale) I took it apart to make it exactly how I wanted it.
Click here for a Burlap Bow Tutorial (same idea of how I made mine)
Next build your bow if it isn't already pre-made. I found a great tutorial of how I made my bow by searching google. This tutorial is from a cute crafting site called "thistlewood farms". Adorable. Even though I purchased it pre-made (since Michael's didn't have a roll of it for sale) I took it apart to make it exactly how I wanted it.
Click here for a Burlap Bow Tutorial (same idea of how I made mine)
- Attach your bow to the center position of the two decor stems. You can either tie or glue the bow to the wreath. I tied mine so I can always easily re-tie or replace it if needed.
- Glue your letter kiddy corner to your bow and stems. My letter is smaller than most wreaths I have seen but I liked the style of it a lot more than a block letter. White is also a common used color and looks very nice as well.
- Last, give the glue a few minutes to cool and then give each piece that is attached a simple tug to make sure it all feels secure, and then voila! A beautiful wreath you will happily call your own.
I hope that this tutorial, although very heavily worded, is easy for you to follow. The pictures should help some, but if you have any questions whatsoever please let myself or Melissa know!
Thanks and have fun!
Lindsey grew up in beautiful Oregon before moving to Central California. She learned how to do everything from scratch growing up with a DIY mom. Now, Lindsey uses her skills to create a beautiful the home and lifestyle without spending a lot of money! You can find more of Lindsey's fun DIY home decor on her blog Life + Style with Lindsey. Follow Lindsey and her DIY and finds on Pinterest


Leave a Comment